引言
熟悉 Vue 的同学们,肯定都用过 Axios , 简洁的 API 语法和方便的拦截器都受到了开发者的热烈欢迎,今天我们就来探索一下他背后的实现原理
本文分析的 Axios 版本为 0.21.0
回顾
首先我们回顾一下常用的 Axios 功能都有哪些
-
axios(config) / axios.get / axios.post / axios.delete ....
调用 axios ,传参发起一个请求,或者直接发起 get、post、delete 等请求
-
axios.create
创建一个新的 axios 实例
-
axios.defaults.xxxx
配置 axios 的默认配置
-
axios.interceptors.request / axios.interceptors.response
配置 axios 的全局拦截器,也可以只配置某个通过 create 创建的实例的拦截器
-
cancel
取消某个请求
接下来我们根据源码一一解析,上述的功能是如何实现的
代码结构
源代码里的主要目录是 lib ,其余的是一些单元测试、文档之类的,这里不再赘述
lib
│  axios.js
│  defaults.js
│  utils.js
│
├─adapters
│      http.js
│      README.md
│      xhr.js
│
├─cancel
│      Cancel.js
│      CancelToken.js
│      isCancel.js
│
├─core
│      Axios.js
│      buildFullPath.js
│      createError.js
│      dispatchRequest.js
│      enhanceError.js
│      InterceptorManager.js
│      mergeConfig.js
│      README.md
│      settle.js
│      transformData.js
│
└─helpers
        bind.js
        buildURL.js
        combineURLs.js
        cookies.js
        deprecatedMethod.js
        isAbsoluteURL.js
        isAxiosError.js
        isURLSameOrigin.js
        normalizeHeaderName.js
        parseHeaders.js
        README.md
        spread.js
这里有几个重要文件(axios.js、defaults.js、utils.js)以及几类文件分别放在四个文件夹里
-
axios.js
该文件作为入口文件,主要作为生成并导出 axios 对象、以及扩展一系列例如 axios.create 的功能方法
-
defaults.js
该文件是默认配置
-
utils.js
该文件是一系列辅助方法,例如:isStirng、extend 等等
-
adapter
该目录里主要存放一些与 ajax 的适配器,也就是封装原生的 xmlHttpRequest 或者 node 的 http 库等,然后处理成方便使用的自己的方法,如果以后有更新的 ajax 方法,例如 fetch,那么 Axios 只需要修改这部分去适配新的接口即可
-
cancel
这里实现取消请求的功能
-
core
这是 Axios 的核心代码,包括 Axios 的基类、一些错误的封装等等,其中比较核心的又有 Axios.js、dispatchRequest.js、InterceptorManager.js
-
helpers
这里另一部分辅助的功能性模块,和 utils.js 的区别可能是因为 utils.js 是更加通用的方法,而这个目录里的则是定制的一些辅助方法
adapter 目录的作用,是因为使用了设计模式里的适配器模式,有兴趣的童鞋可以延伸阅读一下
axios(config) / axios.get / axios.create 等方法实现
我们暂时先不关心具体的实现,首先来看如何将抽象方法暴露出来提供开发者使用,这里主要关注 lib/axios.js 这个文件
// path: lib/axios.js

var utils = require('./utils');
var bind = require('./helpers/bind');
var Axios = require('./core/Axios');
var mergeConfig = require('./core/mergeConfig');
var defaults = require('./defaults');

function createInstance(defaultConfig) {
  var context = new Axios(defaultConfig);
  var instance = bind(Axios.prototype.request, context);

  // Copy axios.prototype to instance
  utils.extend(instance, Axios.prototype, context);

  // Copy context to instance
  utils.extend(instance, context);

  return instance;
}

// Create the default instance to be exported
var axios = createInstance(defaults);

// Factory for creating new instances
axios.create = function create(instanceConfig) {
  return createInstance(mergeConfig(axios.defaults, instanceConfig));
};

axios.Cancel = ...
axios.CancelToken = ...
axios.isCancel = ...
axios.all = ...
axios.spread = ...
axios.isAxiosError = ...

module.exports = axios;
可以看出,我们开发者使用的 axios,也是通过 Axios 基类生成的一个实例(严格意义上说并不是一个单纯的实例)
可能有的同学要问了,为何不直接 export 一个实例呢,还封装一个函数,有什么用意呢,其实这里的目的是在导出实例的同时,将我们标题上说的 axios(config) / axios.get / axios.create 等方法也绑定上去,扩展这个实例,使它的功能更强大,我们接下来一步步看是怎么实现的:
-
var context = new Axios(defaultConfig);
var instance = bind(Axios.prototype.request, context);
这两行先是生成一个实例
context,然后通过bind函数将基类Axios的request方法的上下文this绑定为实例context,并生成一个新的方法instance,也就是未来我们用的axios对象,到这一步,axios对象本质上还只是一个request方法bind 函数相当于 es6 的 Function.prototype.bind 方法,只不过为了兼容性,axios 在这里自己实现了一遍
-
utils.extend(instance, Axios.prototype, context);这一步,通过 extend 方法,将
Axios.prototype,也就是基类的原型链,合并(继承)到instance(request) 对象上,这之中当然是冗余的,也就是instance的原型上也包含自身request方法,到这里就实现了axios(config)(相当于axios.request(config))以及axios.get / axios.post ...(原型链方法)这几个功能这里 extend 函数的第三个参数是
context,作用是将context对象当作Axios.prototype函数的上下文this,extend 也是自己实现的方法,感兴趣的同学可以自行查看 -
utils.extend(instance, context)这一步,还是通过 extend 方法,将
context(实例)的其他属性,例如:defaults、interceptors 合并到instance对象上 -
axios.create = function create(instanceConfig) {
  return createInstance(mergeConfig(axios.defaults, instanceConfig));
};
这里将
createInstance函数扩展为axios.create,允许开发者生成新的实例,同样的,也扩展了Cancel,all等方法
最后,我们得到了一个对象 axios ,它看起来像 Axios 类的实例,用起来也像实例,然而它只是一个 request 方法,但是拥有实例的属性和原型,以及一些其他的 API
年少的我曾经想当然的认为,通过
axios.create创建的实例,还可以继续通过create创建子类,现在看了源码之后终于悟了,原来根本就没有这层设计
axios 的默认配置
接下来我们在深入具体逻辑之前,先看一下,Axios 都有什么默认配置,如何实现修改全局配置,以及区分实例的配置
再回看一下上面的代码以及 Axios 基类
// lib/core/Axios.js
function Axios(instanceConfig) {
  this.defaults = instanceConfig;
  this.interceptors = {
    request: new InterceptorManager(),
    response: new InterceptorManager()
  };
}
// lib/axios.js
var defaults = require('./defaults');
// Create the default instance to be exported
var axios = createInstance(defaults);

// Factory for creating new instances
axios.create = function create(instanceConfig) {
  return createInstance(mergeConfig(axios.defaults, instanceConfig));
};
全局配置是一个文件,通过 new 一个实例,绑定到 axios 对象上的 defaults 属性上,而之后通过 axios.create 创建的实例,都要和 axios.defaults 合并之后再实例化,因此,axios.defaluts 就变成了一个全局配置,修改该属性会影响 axios 对象以及通过它派生出来的所有实例,而实例上有自己的 defaults 对象,修改它只会影响自己
接下来我们看一下具体的默认配置都有哪些
var DEFAULT_CONTENT_TYPE = {
  'Content-Type': 'application/x-www-form-urlencoded'
};

function getDefaultAdapter() {
  var adapter;
  if (typeof XMLHttpRequest !== 'undefined') {
    // For browsers use XHR adapter
    adapter = require('./adapters/xhr');
  } else if (typeof process !== 'undefined' && Object.prototype.toString.call(process) === '[object process]') {
    // For node use HTTP adapter
    adapter = require('./adapters/http');
  }
  return adapter;
}

var defaults = {
  adapter: getDefaultAdapter(),
  transformRequest: [...],
  transformResponse: [...],
  timeout: 0,
  xsrfCookieName: 'XSRF-TOKEN',
  xsrfHeaderName: 'X-XSRF-TOKEN',
  maxContentLength: -1,
  maxBodyLength: -1,
  validateStatus: function validateStatus(status) {
    return status >= 200 && status < 300;
  }
};
defaults.headers = {
  common: {
    'Accept': 'application/json, text/plain, */*'
  }
};
utils.forEach(['delete', 'get', 'head'], function forEachMethodNoData(method) {
  defaults.headers[method] = {};
});
utils.forEach(['post', 'put', 'patch'], function forEachMethodWithData(method) {
  defaults.headers[method] = utils.merge(DEFAULT_CONTENT_TYPE);
});
module.exports = defaults;
这里省略了一些细节,具体可以去源代码里查看,但是看到这里是不是很多同学反应过来了,原来文档里说的根本不是默认配置,只是列举了一下所有可用的配置以及应该传什么值,而真正的默认配置只有上面文件里的这些
-
adapter
这里区分了浏览器环境还是 Node 环境,这里分别匹配了 lib/adapters/xhr.js 和 lib/adapters/http.js 文件,也允许开发者自己做适配,反正我还没有适配过。。
-
transformRequest 和 transformResponse
这里都有默认配置,判断分支还挺多,如果修改配置的话,直接赋值,这些逻辑就都没了,个人感觉这里设计的不是很好,所以如果只是想增加新的 transform 规则的话,我建议在默认的基础上新增:
axios.defaults.transformRequest = [ ...axios.defaults.transformRequest, ...customerTransform ] -
timeout、xsrfCookieName、xsrfHeaderName、maxContentLength、maxBodyLength、validateStatus
这些配置都很容易理解,这里不赘述
-
headers
默认的 header 头,有一个通用 Accept 头,然后具体区分了一下请求类型,只有
'post', 'put', 'patch'这三种请求会带上默认的'Content-Type': 'application/x-www-form-urlencoded',看清楚了啊,可不是'application/json'(狗头)
axios.request
接下来我们看看发请求的核心逻辑,这部分逻辑由 3 个部分组成,我们一层层看下去
request
// lib/core/Axios.js
var dispatchRequest = require('./dispatchRequest');

Axios.prototype.request = function request(config) {
  if (typeof config === 'string') {
    config = arguments[1] || {};
    config.url = arguments[0];
  } else {
    config = config || {};
  }

  config = mergeConfig(this.defaults, config);

  // Set config.method
  if (config.method) {
    config.method = config.method.toLowerCase();
  } else if (this.defaults.method) {
    config.method = this.defaults.method.toLowerCase();
  } else {
    config.method = 'get';
  }

  // Hook up interceptors middleware
  var chain = [dispatchRequest, undefined];
  var promise = Promise.resolve(config);

  this.interceptors.request.forEach(function unshiftRequestInterceptors(interceptor) {
    chain.unshift(interceptor.fulfilled, interceptor.rejected);
  });

  this.interceptors.response.forEach(function pushResponseInterceptors(interceptor) {
    chain.push(interceptor.fulfilled, interceptor.rejected);
  });

  while (chain.length) {
    promise = promise.then(chain.shift(), chain.shift());
  }

  return promise;
};
这段代码其实不难理解,我们分解一下
-
if (typeof config === 'string') {
  config = arguments[1] || {};
  config.url = arguments[0];
} else {
  config = config || {};
}

config = mergeConfig(this.defaults, config);

if (config.method) {
  config.method = config.method.toLowerCase();
} else if (this.defaults.method) {
  config.method = this.defaults.method.toLowerCase();
} else {
  config.method = 'get';
}
这里先做了一下兼容,如果
config是字符串,那么就认为它是config对象的url属性,最终使用的还是config对象,保证数据结构的一致性,然后将传参与本实例的默认配置合并,并保证method属性一定有,至少是'get'这里特意判断
method,一是为了格式化为小写,再一个默认配置里没有method的配置,所以为了不能为空,必须赋一个值,不过这里我不是很理解为何不给method一个默认值。。 -
var chain = [dispatchRequest, undefined]; var promise = Promise.resolve(config); this.interceptors.request.forEach(function unshiftRequestInterceptors(interceptor) { chain.unshift(interceptor.fulfilled, interceptor.rejected); }); this.interceptors.response.forEach(function pushResponseInterceptors(interceptor) { chain.push(interceptor.fulfilled, interceptor.rejected); }); while (chain.length) { promise = promise.then(chain.shift(), chain.shift()); } return promise;dispatchRequest是真正发请求的抽象方法,我们会在下面详细说明,而interceptors.request和interceptors.response则是请求和响应的拦截器,连续两个方法为一组,分别对应then和catch中,每个方法都返回一个Promise,放到chain数组中,然后通过循环这个数组,生成一个Promise调用链,中间只要有一步抛异常,就会走到最近的catch中,如果catch返回了一个resolve状态的Promise,那么调用链还可以继续往下走,有点迷惑的童鞋可以看下图帮助理解
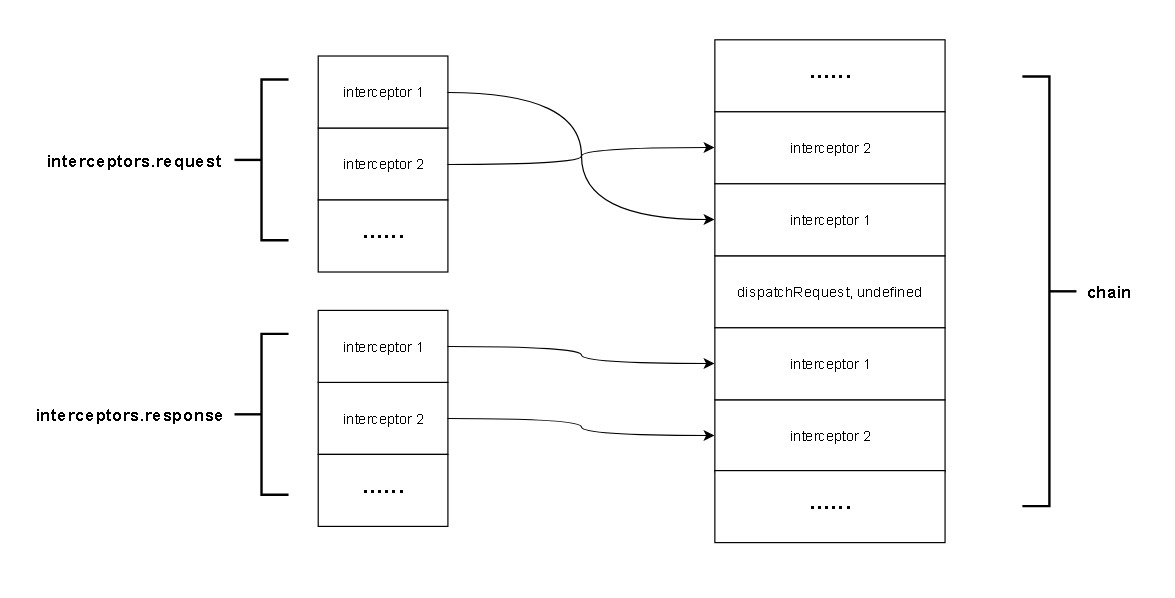
这里虽然文档没有明说,但是分析代码可以看出,请求拦截器
interceptors.request我们使用的时候是顺序加入到InterceptorManager类里,但是调用的时候却是顺序循环并通过Array.prototype.unshift到调用链数组里,那么也就是说第一个加入的拦截器会放在最后一个去调用,实际上也确实如此,这里可能有点小坑,如果加了多个请求拦截器规则又需要有顺序的话,一定要倒着写,不然无法得到想要的结果
dispatchRequest
module.exports = function dispatchRequest(config) {
  throwIfCancellationRequested(config);

  // Ensure headers exist
  config.headers = config.headers || {};

  // Transform request data
  config.data = transformData(
    config.data,
    config.headers,
    config.transformRequest
  );

  // Flatten headers
  config.headers = utils.merge(
    config.headers.common || {},
    config.headers[config.method] || {},
    config.headers
  );

  utils.forEach(
    ['delete', 'get', 'head', 'post', 'put', 'patch', 'common'],
    function cleanHeaderConfig(method) {
      delete config.headers[method];
    }
  );

  var adapter = config.adapter || defaults.adapter;

  return adapter(config).then(function onAdapterResolution(response) {
    throwIfCancellationRequested(config);

    // Transform response data
    response.data = transformData(
      response.data,
      response.headers,
      config.transformResponse
    );

    return response;
  }, function onAdapterRejection(reason) {
    if (!isCancel(reason)) {
      throwIfCancellationRequested(config);

      // Transform response data
      if (reason && reason.response) {
        reason.response.data = transformData(
          reason.response.data,
          reason.response.headers,
          config.transformResponse
        );
      }
    }

    return Promise.reject(reason);
  });
};
这里还有 Cancel 的代码,我们暂且略过,着重看请求部分
-
config.data = transformData(
  config.data,
  config.headers,
  config.transformRequest
);
这里通过
transformData这个方法,将配置中的config.transformRequest方法,应用到config.data中,关于transformRequest,可以参见文档 -
config.headers = utils.merge(
  config.headers.common || {},
  config.headers[config.method] || {},
  config.headers
);

utils.forEach(
  ['delete', 'get', 'head', 'post', 'put', 'patch', 'common'],
  function cleanHeaderConfig(method) {
    delete config.headers[method];
  }
);
这部分合并了不同来源的
headers,都有什么来源呢,代码里也能很清晰的看到,包括通用配置config.headers.common、特定方法的配置config.headers[config.method](也就是config.headers.get/config.headers.post等等....),以及当下请求传来的headers配置,最后,因为common,get,post等等这些配置都写在 headers 里,发请求时是不需要的,所以通通删了,当然这里merge方法是个深拷贝,所以随便删,不影响原对象 -
return adapter(config).then(function onAdapterResolution(response) {
  throwIfCancellationRequested(config);

  // Transform response data
  response.data = transformData(
    response.data,
    response.headers,
    config.transformResponse
  );

  return response;
}, function onAdapterRejection(reason) {
  if (!isCancel(reason)) {
    throwIfCancellationRequested(config);

    // Transform response data
    if (reason && reason.response) {
      reason.response.data = transformData(
        reason.response.data,
        reason.response.headers,
        config.transformResponse
      );
    }
  }

  return Promise.reject(reason);
});
最后这部分也很好理解,调用适配器,把
config传过去,然后处理then,或者catch步骤,这里对结果应用了config.transformResponse方法
adapter
发请求的最终过程,还是在不同的适配器里实现,因为我个人用 Node 比较少,这里就看一下浏览器的适配器,也就是 lib/adapters/xhr.js
module.exports = function xhrAdapter(config) {
  return new Promise(function dispatchXhrRequest(resolve, reject) {
    var requestData = config.data;
    var requestHeaders = config.headers;

    // formData 时删除 Content-Type
    if (utils.isFormData(requestData)) {...}

    var request = new XMLHttpRequest();

    // 设置 header Authorization
    if (config.auth) {...}

    var fullPath = buildFullPath(config.baseURL, config.url);
    request.open(config.method.toUpperCase(), buildURL(fullPath, config.params, config.paramsSerializer), true);

    // 设置超时时间
    request.timeout = config.timeout;

    // 监听 xhr 各种事件
    request.onreadystatechange = function handleLoad() {...};
    request.onabort = function handleAbort() {...};
    request.onerror = function handleError() {...};
    request.ontimeout = function handleTimeout() {...};

    // 应对 xsrf/csrf 攻击,可以配置将 cookie 放在 header 中
    if (utils.isStandardBrowserEnv()) {...}

    // 将其他 config.headers 设置到 header 中
    if ('setRequestHeader' in request) {...}

    // 设置 withCredentials 属性
    if (!utils.isUndefined(config.withCredentials)) {...}

    // 设置 responseType
    if (config.responseType) {...}

    // 设置上传文件的进度
    if (typeof config.onDownloadProgress === 'function') {...}
    if (typeof config.onUploadProgress === 'function' && request.upload) {...}

    // 取消请求的操作
    if (config.cancelToken) {...}

    // 请求主体
    if (!requestData) {
      requestData = null;
    }

    // 发请求
    request.send(requestData);
  });
};
这里我将大部分代码都省略了,这样对整个适配过程更加清楚,基本的过程我都标注在上面代码里的注释了,接下来我们一步一步的细看
-
if (utils.isFormData(requestData)) {
  delete requestHeaders['Content-Type']; // Let the browser set it
}
如果是
FormData,就删除Content-Type,让浏览器自己设置,这里一般都会设置成multipart/form-data -
if (config.auth) {
  var username = config.auth.username || '';
  var password = config.auth.password ? unescape(encodeURIComponent(config.auth.password)) : '';
  requestHeaders.Authorization = 'Basic ' + btoa(username + ':' + password);
}
这里提供了一个快速设置 HTTP 认证的方法,设置方法就是通过用户名和密码,在请求头里增加
Authorization字段,值为Basic加 base64 编码后的用户名密码字符串,具体可以参见 HTTP 身份认证 -
var fullPath = buildFullPath(config.baseURL, config.url);
request.open(config.method.toUpperCase(), buildURL(fullPath, config.params, config.paramsSerializer), true);
这里初始化一个请求,包括请求方法,请求地址,是否为异步等等,请求方法全部转为小写,请求地址是参数和地址拼起来的,就如:
xxx?a=b&c=d -
request.onreadystatechange = function handleLoad() {
  if (!request || request.readyState !== 4) {
    return;
  }

  // The request errored out and we didn't get a response, this will be
  // handled by onerror instead
  // With one exception: request that using file: protocol, most browsers
  // will return status as 0 even though it's a successful request
  if (request.status === 0 && !(request.responseURL && request.responseURL.indexOf('file:') === 0)) {
    return;
  }

  // Prepare the response
  var responseHeaders = 'getAllResponseHeaders' in request ? parseHeaders(request.getAllResponseHeaders()) : null;
  var responseData = !config.responseType || config.responseType === 'text' ? request.responseText : request.response;
  var response = {
    data: responseData,
    status: request.status,
    statusText: request.statusText,
    headers: responseHeaders,
    config: config,
    request: request
  };

  settle(resolve, reject, response);

  // Clean up request
  request = null;
};
module.exports = function settle(resolve, reject, response) { var validateStatus = response.config.validateStatus; if (!response.status || !validateStatus || validateStatus(response.status)) { resolve(response); } else { reject(createError( 'Request failed with status code ' + response.status, response.config, null, response.request, response )); } };这里主要看一下
onreadystatechange,也就是请求响应之后的处理,我们注意到在判断status的时候有一句注释,很重要,就是说:如果请求发生错误了,是通过onerror这个handler来处理的,但是有一种例外,那就是用file:发起的请求,大多数浏览器会返回status:0,即使这个请求成功了,我们知道,一般 HTTP 状态码,200 表示成功,所以,这里代码特殊判断了一下其余的就正常处理,将
resolve和reject交给 settle 方法来处理,这里判断逻辑也可以定义自己的validateStatus方法最后还有几个额外的处理,虽然不影响主流程,但是还是可以看一下
-
if (utils.isStandardBrowserEnv()) {
  // Add xsrf header
  var xsrfValue = (config.withCredentials || isURLSameOrigin(fullPath)) && config.xsrfCookieName ?
    cookies.read(config.xsrfCookieName) :
    undefined;

  if (xsrfValue) {
    requestHeaders[config.xsrfHeaderName] = xsrfValue;
  }
}
如果你配置了
xsrfHeaderName和xsrfCookieName这个属性,那么在发请求时,会自动读取cookie中的相应值并带到header中 -
var requestHeaders = config.headers;
if ('setRequestHeader' in request) {
  utils.forEach(requestHeaders, function setRequestHeader(val, key) {
    if (typeof requestData === 'undefined' && key.toLowerCase() === 'content-type') {
      // Remove Content-Type if data is undefined
      delete requestHeaders[key];
    } else {
      // Otherwise add header to the request
      request.setRequestHeader(key, val);
    }
  });
}
如果设置了
headers属性,则设置到请求头里,注意,这里如果请求体没有数据的话,会直接删掉content-type头
最后发送 ajax 请求,如果没有 requestData ,则 send(null)
取消一个请求
之前的几个代码里,我们都跳过了取消请求相关的处理逻辑,因为跟主题的逻辑关系不大,在这里,我们统一解析一下
用法
我们先回顾一下,Cancel 这个功能是怎么用的,可能大部分人都没用过
const CancelToken = axios.CancelToken;
const source = CancelToken.source();

axios.get('/user/12345', {
  cancelToken: source.token
}).catch(function (thrown) {
  if (axios.isCancel(thrown)) {
    console.log('Request canceled', thrown.message);
  } else {
    // handle error
  }
})

// cancel the request (the message parameter is optional)
source.cancel('Operation canceled by the user.');
首先,通过 CancelToken.source() 方法生成一个 source 对象,source 对象里有两个属性,一个是 token,一个是 cancel 方法,请求的时候将 token 传到配置里,即可在任意时刻通过调用 cancel 方法来取消请求
所以,这个 source 就是取消的核心
Cancel 核心代码
var Cancel = require('./Cancel');

function CancelToken(executor) {
  if (typeof executor !== 'function') {
    throw new TypeError('executor must be a function.');
  }

  var resolvePromise;
  this.promise = new Promise(function promiseExecutor(resolve) {
    resolvePromise = resolve;
  });

  var token = this;
  executor(function cancel(message) {
    if (token.reason) {
      return;
    }

    token.reason = new Cancel(message);
    resolvePromise(token.reason);
  });
}

CancelToken.prototype.throwIfRequested = function throwIfRequested() {
  if (this.reason) {
    throw this.reason;
  }
};

CancelToken.source = function source() {
  var cancel;
  var token = new CancelToken(function executor(c) {
    cancel = c;
  });
  return {
    token: token,
    cancel: cancel
  };
};

module.exports = CancelToken;
解析:
CancelToken.source 方法,通过 CancelToken 生成一个 token,并且生成的同时, CancelToken 可以传一个回调函数,将某些方法绑定到了 cancel 属性上
继续看 CancelToken 工厂,通过 new 操作符调用的时候,会返回实例本身,也就是说,token 就是 CancelToken 的一个实例对象
在初始化过程中,token 对象会有 promise 与 reason 两个属性
首先将 resolvePromise 变量绑定为一个 promise 属性的 resolve 方法,接着在回调函数中传一个 cancel 方法(也就是 CancelToken.source().cancel 方法),当 cancel 被调用的时候,会 resolve Promise,同时,token 这个对象中的 reason 属性也可能会有值,有值的话即代表已经取消过了,可以防止重复使用
token 对象还有一个 throwIfRequested 方法,即通过判断是否有 reason 值,来抛一个异常,使请求直接走到 catch 阶段
两外两个文件 lib/cancel/Cancel.js 和 lib/cancel/isCancel.js 这里就不详细说明了,代码很少,基本是用某个实例的静态属性用来判断是否已经取消的逻辑,大家可以自行看一下
请求中使用 Cancel
之前我们分析发请求的过程中,出现了 Cancel 逻辑,一起将这部分补完
// lib/axios.js
axios.Cancel = require('./cancel/Cancel');
axios.CancelToken = require('./cancel/CancelToken');
axios.isCancel = require('./cancel/isCancel');
这里主要是导出了生产 source 的工厂 CancelToken
// lib/core/dispatchRequest.js
function throwIfCancellationRequested(config) {
  if (config.cancelToken) {
    config.cancelToken.throwIfRequested();
  }
}

function dispatchRequest(config) {
  throwIfCancellationRequested(config);
  ...

  return adapter(config).then(function onAdapterResolution(response) {
    throwIfCancellationRequested(config);
    ...
  }, function onAdapterRejection(reason) {
    if (!isCancel(reason)) {
      throwIfCancellationRequested(config);
      ...
    }
    return Promise.reject(reason);
  });
}
这里在发请求的初始化、请求成功、请求失败时都通过 throwIfRequested 判断了用户是否调用过 cancel 方法,一旦判断调用过,直接抛出异常,走到 catch 流程,不管请求状态如何都不去处理了
throwIfRequested方法只有当token有reason属性的时候,才会抛异常,当没有调用cancel方法的时候,token永远没有reason属性,因此throwIfRequested可以在任何时候调用,而不用担心请求是否被取消
// lib/adapters/xhr.js
if (config.cancelToken) {
  // Handle cancellation
  config.cancelToken.promise.then(function onCanceled(cancel) {
    if (!request) {
      return;
    }

    request.abort();
    reject(cancel);
    // Clean up request
    request = null;
  });
}
在适配器里,初始化 ajax 对象的时候,绑定一个 promise,大家还记得 token 对象里有一个 promise 属性吧,就是用在这里的,当这个 promise 被 resolve 的时候,也就是用户调用了 cancel 方法,这里会通过闭包获取到 ajax 对象,然后调用 request.abort() ,这样在 xhr 流程中,也中断了请求的继续发送,同时将整个适配器的状态置为 reject
到这里,请求的所有阶段就都有了 cancel 的参与,在任何时候取消,都可以直接走入 reject 流程
结语
以上就是 Axios 的核心功能,其实逻辑并不难理解,主要是封装思路以及一些设计模式值得我们学习,另外,也可以了解一些请求过程中的坑(比如:file 开头的请求),以后在使用的过程中,如果遇到了文档里看不到的问题,不妨在源码里寻找答案,如果有新的想法,也可以直接去 GitHub 提需求,希望大家不要畏惧看源码,毕竟,源码写的要比我们接手的项目更加优美,不是吗?